Bonding Examples
Bonding EoIP tunnels over two wireless links
This is an example of aggregating multiple network interfaces into a single pipe. In particular, it is shown how to aggregate multiple virtual (EoIP) interfaces to get maximum throughput (MT) with emphasis on availability.
Network Diagram
Two routers R1 and R2 are interconnected via wireless links. Wireless interfaces on both sides have assigned IP addresses.
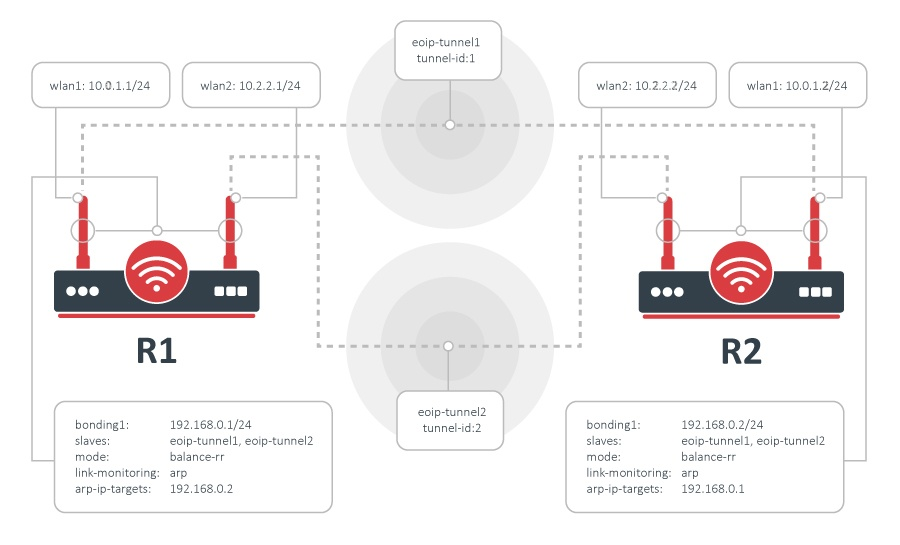 Configuration
Bonding could be used only on OSI layer 2 (Ethernet level) connections. Thus we need to create EoIP interfaces on each of the wireless links. This is done as follows:
On router R1:
/interface/eoip/add remote-address=10.0.1.1/24 tunnel-id=1
/interface/eoip/add remote-address=10.2.2.1/24 tunnel-id=2
and on router R2:
/interface/eoip/add remote-address=10.0.1.2/24 tunnel-id=1
/interface/eoip/add remote-address=10.2.2.2/24 tunnel-id=2
The second step is to add a bonding interface and specify EoIP interfaces as slaves:
R1:
/interface/bonding/add slaves=eoip-tunnel1,eoip-tunnel2 mode=balance-rr
R2:
/interface/bonding/add slaves=eoip-tunnel1,eoip-tunnel2 mode=balance-rr
The last step is to add IP addresses to the bonding interfaces:
R1:
/ip/address/add 192.168.0.1/24 interface=bonding1
R2:
/ip/address/add 192.168.0.2/24 interface=bonding1
Test the configuration
Now two routers are able to reach each other using addresses from the 192.168.0.0/24 network. To verify bonding interface functionality, do the following:
R1:
/interface/monitor-traffic eoip-tunnel1,eoip-tunnel2
R2:
/tool/bandwidth-test 192.168.0.1 direction=transmit
You should see that traffic is distributed equally across both EoIP interfaces:
/int -traffic eoip-tunnel1,eoip-tunnel2
received-packets-per-second: 685 685
received-bits-per-second: 8.0Mbps 8.0Mbps
sent-packets-per-second: 21 20
sent-bits-per-second: 11.9kbps 11.0kbps
received-packets-per-second: 898 899
received-bits-per-second: 10.6Mbps 10.6Mbps
sent-packets-per-second: 20 21
sent-bits-per-second: 11.0kbps 11.9kbps
received-packets-per-second: 975 975
received-bits-per-second: 11.5Mbps 11.5Mbps
sent-packets-per-second: 22 22
sent-bits-per-second: 12.4kbps 12.3kbps
received-packets-per-second: 980 980
received-bits-per-second: 11.6Mbps 11.6Mbps
sent-packets-per-second: 21 21
sent-bits-per-second: 11.9kbps 11.8kbps
received-packets-per-second: 977 977
received-bits-per-second: 11.6Mbps 11.5Mbps
sent-packets-per-second: 21 21
sent-bits-per-second: 11.9kbps 11.8kbps
-- [Q quit|D dump|C-z pause]
Link Monitoring
It is easy to notice that with the configuration above as soon as any individual link fails, the bonding interface throughput collapses. That's because no link monitoring is performed; consequently, the bonding driver is unaware of problems with the underlying links. Enabling link monitoring is a must in most bonding configurations. To enable ARP link monitoring, do the following:
R1
/interface/bonding/set bonding1 link-monitoring= arp-ip-targets=192.168.0.2
R2
/interface/bonding/set bonding1 link-monitoring= arp-ip-targets=192.168.0.1